Virtualization How-To: Mastering VMs and Containers for Your Homelab
A comprehensive guide to virtualization fundamentals, including KVM/QEMU setup, VM vs container decisions, best practices, and advanced techniques for homelab environments.

Virtualization has become an essential skill for modern IT professionals, especially in the homelab community. Whether you're looking to run multiple operating systems, test different configurations, or deploy containerized applications, understanding virtualization fundamentals is crucial.
Understanding Virtualization Fundamentals
Virtualization allows you to run multiple virtual machines (VMs) or containers on a single physical machine by abstracting hardware resources. This technology enables efficient resource utilization, improved isolation, and simplified management.
Key Concepts
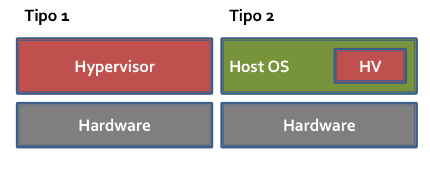
Hypervisor Types:
- Type 1 (Bare-metal): Runs directly on the host's hardware (e.g., VMware ESXi, Xen)
- Type 2 (Hosted): Runs on top of a host operating system (e.g., VirtualBox, VMware Workstation)
Virtual Machine vs Container:
- VMs: Full OS virtualization with complete isolation
- Containers: Lightweight virtualization sharing the host OS kernel
Getting Started with KVM/QEMU Virtualization
For Linux users, KVM (Kernel-based Virtual Machine) combined with QEMU provides a powerful, open-source virtualization solution.
Prerequisites
- CPU with virtualization support (Intel VT-x or AMD-V)
- At least 8GB RAM for basic VMs
- SSD storage for better performance
Installation Steps
On Ubuntu/Debian:
sudo apt install qemu-kvm libvirt-daemon-system libvirt-clients bridge-utils virtinst
On Fedora/RHEL:
sudo dnf install qemu-kvm libvirt virt-install virt-manager
Basic Configuration
Start and enable the libvirt service:
sudo systemctl start libvirtd
sudo systemctl enable libvirtd
Add your user to the libvirtd group:
sudo usermod -aG libvirt $USER
Creating Your First Virtual Machine
Using virt-install for command-line creation:
virt-install \
  --name=ubuntu-server \
  --ram=2048 \
  --disk=path=/var/lib/libvirt/images/ubuntu-server.qcow2,size=20 \
  --graphics=vnc,listen=0.0.0.0 \
  --cdrom=/path/to/ubuntu.iso
Containerization with Docker and Podman
While VMs offer full OS isolation, containers provide lightweight alternatives for running applications.
Installing Docker:
sudo apt install docker.io
sudo usermod -aG docker $USER
Running Your First Container:
docker run -d --name nginx-web \
  -p 8080:80 \
  nginx:latest
Homelab Best Practices
Resource Management
- CPU: Allocate cores based on workload needs (1-2 for light VMs, 4+ for heavy workloads)
- Memory: Start with conservative allocations and adjust as needed
- Storage: Use SSDs for VM disks; consider LVM for flexible storage management
Security Considerations
- Keep hypervisor and guest OSes updated regularly
- Isolate experimental workloads from production systems
- Implement least-privilege access controls
- Monitor logs and audit trails for anomalies
Backup and Recovery
- VM Snapshots: Use tools like
virsh snapshotto create point-in-time backups - Container Backups: Backup container images and persistent data volumes
- Automated Scheduling: Set up regular backup schedules using cron jobs
Advanced Techniques
High Availability Clustering
For production-like environments, consider setting up clusters:
- Proxmox VE: Enterprise-grade solution with HA features
- Kubernetes with KubeVirt: Container-native virtualization approach
GPU Passthrough
Enable direct hardware access for graphics-intensive applications:
# Check GPU support
lspci | grep -i nvidia

# Enable IOMMU in BIOS and kernel parameters
Choosing Between VMs and Containers
Use VMs when:
- You need full OS isolation
- Running Windows or proprietary operating systems
- Require GPU passthrough
- Need to run legacy applications
Use Containers when:
- Deploying microservices
- Need rapid deployment and scaling
- Working with Linux-based applications
- Want resource efficiency
Monitoring and Optimization
Performance Metrics
Monitor key metrics like CPU usage, memory consumption, and disk I/O:
# Check VM performance
virsh domstats <vm-name>

# Monitor container resources
docker stats
Optimization Tips
- Enable nested virtualization if running VMs inside containers
- Use SSD storage for VM disks
- Consider memory ballooning for dynamic resource allocation
- Implement proper network configuration with bridges
Conclusion
Virtualization opens up endless possibilities for experimentation and learning. Whether you're building a simple homelab or planning enterprise infrastructure, mastering these concepts will serve you well in your IT journey.
The key is to start simple and gradually build complexity as you gain confidence. Begin with basic VM creation, then explore containerization, and eventually tackle advanced topics like clustering and high availability.
Remember that virtualization isn't just about running multiple OSes—it's about creating flexible, isolated environments where you can safely experiment, learn, and develop your skills without impacting your primary system.
With proper planning, implementation, and adherence to best practices, your virtualization setup will become an invaluable tool for learning, testing, and deploying applications in a controlled environment.
Feature image: RicoRico / CC BY-SA 4.0 / Wikimedia Commons.
